Difference between revisions of "New Pilot"
Lordjeroen (talk | contribs) m |
|||
| (One intermediate revision by one other user not shown) | |||
| Line 1: | Line 1: | ||
Welcome to Star Sonata! We hope that the Star Sonata Wiki will be helpful to you on your journey through the game! | Welcome to Star Sonata! We hope that the Star Sonata Wiki will be helpful to you on your journey through the game! | ||
| − | Once you have | + | Once you have come up with a user name and password you will be able to choose a faction to join, either the [[Volcom Pirates]] or the [[Earthforce|Nexus Cadets]]. |
[[Image:Choosing a side!.png]] | [[Image:Choosing a side!.png]] | ||
| Line 21: | Line 21: | ||
*[[Radars|Ande Radar]] | *[[Radars|Ande Radar]] | ||
| − | For starting players it is good to note that the [[Shield Salvation Device]] and [[Mini Mass Driver Device]] will help you greatly when used so use them often, another thing is that from certain missions and kills you will sometimes get [[Augmenters]], these will boost the stats of your ship in certain areas to | + | For starting players it is good to note that the [[Shield Salvation Device]] and [[Mini Mass Driver Device]] will help you greatly when used so use them often, another thing is that from certain missions and kills you will sometimes get [[Augmenters]], these will boost the stats of your ship in certain areas. Augmenters need to be the same as or lower than the [[Tech Level]] of your ship in order to equip them. Remember that you can always destroy an equipped augmenter by right-clicking it and selecting ''Destroy Augmenter''. However, be careful! Some augmenters are worth quite a lot, so always be sure you know what you want to do before you do it. |
| − | |||
| − | |||
[[Image:Chat Barc2.png]] | [[Image:Chat Barc2.png]] | ||
| − | + | The chat bar is located at the bottom-left corner of the screen. It is split into seven different channels, each of which have unique purposes: | |
| − | *<font color="#808080">Event</font> Tab is where you can view what loot you scoop, when you level, when someone gives you money | + | *<font color="#808080">Event</font> Tab is where you can view what loot you scoop, when you level, when someone gives you money, and other game-related messages. |
| − | *<font color="#BFFF00">All</font> chat is where players can communicate | + | *<font color="#BFFF00">All</font> chat is where players can communicate with one another universally. Anyone can talk or speak in this channel. |
| − | *<font color="#318CE7">Trade</font> chat is where | + | *<font color="#318CE7">Trade</font> chat is where players advertise the items they wish to buy or sell. Players can also advertise their shops here. |
| − | *<font color="#228B22">Team</font> chat is | + | *<font color="#228B22">Team</font> chat is available when you have joined a [[Team]]. It allows you to speak to other teammates directly, without the need to worry about other players. |
*<font color="#CA1F7B">Help</font> chat is the place for new players to ask questions when they don't understand how something works. | *<font color="#CA1F7B">Help</font> chat is the place for new players to ask questions when they don't understand how something works. | ||
| − | *<font color="#FF9F00">Galaxy</font> chat is for | + | *<font color="#FF9F00">Galaxy</font> chat is the local channel for the [[galaxy]] you are currently in. Only other players inside the same galaxy can speak to you through this channel. |
| − | *And <font color="#E6E6FA">Squad</font> chat is to talk to people who are in the same squad as you, it will also show what other | + | *And <font color="#E6E6FA">Squad</font> chat is to talk to people who are in the same squad as you, it will also show what other squad-mates have been scooping. |
| − | |||
| − | |||
| − | |||
| − | |||
| + | When there is a new message in a channel, its tab will begin to flash or glow. | ||
| + | To send a personal message to another player (in this case Demon Hunter), then you would type this command into any chat channel: | ||
| + | */w "Demon Hunter" hi | ||
| + | A new tab will appear allowing you to make conversation with that player. | ||
[[Image:Toolbarc2.png]] | [[Image:Toolbarc2.png]] | ||
| − | Now | + | Now let's see if we can make sense of the menu system. The menu bar is located at the bottom right-hand corner of the screen. |
| + | Here's a breakdown of what each button means and what it does: | ||
[[Image:Warp Symbolc2.png]] | [[Image:Warp Symbolc2.png]] | ||
| − | This is the Warp symbol (F | + | This is the Warp symbol (F key), it allows you to warp into different galaxies when you are hovering over a wormhole. You will know when you can attempt to warp through a wormhole because the symbol will turn orange. |
[[Image:Dock Symbolc2.png]] | [[Image:Dock Symbolc2.png]] | ||
| − | This is the Request Docking | + | This is the Request Docking button (R key), it allows players to attempt to dock in an [[Stations|AI Base]] or a [[Bases|Player Base]]. You will know when you can attempt to dock because the symbol will turn orange. |
[[Image:Map Symbolc2.png]] | [[Image:Map Symbolc2.png]] | ||
| − | This is the Map symbol (F6 | + | |
| + | This is the Map symbol (F6 key), it opens the [[Galaxy Map]] and also shows what galaxy you are currently in. | ||
[[Image:Map4c2.png]] | [[Image:Map4c2.png]] | ||
| − | Clicking on the map | + | Clicking on the map button will open up the Galaxy Map. This map shows you all the places you have been, as well as a few pre-explored areas. The map is divided up into several layers, which can be changed by clicking the up or down arrows. You'll notice that your map is quite empty at first - this is okay, as you still haven't explored the [[Universe]] yet. When you enter a new galaxy for the first time, it will appear on your map and stay there for future reference. |
| + | There's a lot of information on this map, but the most important to you would probably be the color coding and station tabs. | ||
| − | + | The station tabs are the white bars along the outside of each galaxy's icon. There's a single tab for each station or base in the galaxy: white for AI owned, yellow for those belonging to other players, green for your team's bases, and blue for your own (if you have any). | |
| − | + | The color coding indicates what level of [[Warp Navigation]] you'll need to travel there. The color is also somewhat indicative of the difficulty of that galaxy, though the [[Danger Factor]] plays a much larger role. | |
| + | * Green: Warp 0 | ||
| + | * Blue: Warp 1 | ||
| + | * Red: Warp 2 | ||
| + | * Purple: Warp 3 | ||
| + | Additionally, the ship button will center the map on your current location while the 1x, 2x, and crossed arrows are used to change the size of the map. You can also click one of the corners and drag to set a custom size. Lastly, you can use the scrollbar or your mouse wheel to zoom in and out on the map. | ||
[[Image:Options Symbolc2.png]] | [[Image:Options Symbolc2.png]] | ||
| − | This is the Options symbol (F7 or O | + | This is the Options symbol (F7 or O key), which allows you to change how the game works. There are tabs for Graphics, Sound, Display, Social, and Keys. You can also toggle the Lag Killer on and off - this can sometimes help if the game is acting slow! |
[[Image:Social Symbolc2.png]] | [[Image:Social Symbolc2.png]] | ||
| − | This is the Social symbol (F8 | + | This is the Social symbol (F8 key), from which you can manage your [[Squad]], [[Team]], and Friends List. |
| + | *Squad lets you create temporary teams. Squads are extremely useful for tackling difficult [[DG|Dungeons]] or killing [[Uber AI]]. Any player in your squad will be treated like a Teammate, meaning any enemies of theirs are also your enemies and vice versa. Drones will also defend Squadmates, and Squadmates can be [[Tractoring|Tractored]], which can be useful. | ||
| + | *Team lets you manage, create, and interact with your [[Team]]. In order to create a Team of your own, you'll need to get the [[Leadership]] skill first. You can join other Teams through invitation only, though many are often looking for new recruits so just ask around! | ||
| + | *Friends lets you create and manage your Friends List. Anyone can be added to the list, just type in their name or target them and hit the ''Invite Target'' button. If they friend you back, you'll even be able to see where they're at when they're online. | ||
[[Image:Character Symbolc2.png]] | [[Image:Character Symbolc2.png]] | ||
| − | This is the Character symbol (F9 | + | This is the Character symbol (F9 key, M key for [[Missions]]), it allows you to access your Avatar, Possessions, Skills, and Missions tabs. |
| + | *The Avatar tab displays your name, level, kills, and [[Death Debt]] | ||
| + | *The Possessions tab is a list of all your [[Ships]], [[Drones]], Bases, and [[Slaves]] | ||
| + | *The Skills tab shows what [[Skills]] you have earned and how many [[Skill Points]] you have left | ||
| + | *The Missions tab lists all your currently active Missions and their requirements. You can also abort or suspend (deactivate) Missions here | ||
[[Image:Ship Symbolc2.png]] | [[Image:Ship Symbolc2.png]] | ||
| − | This is the Ship Details symbol (F10 | + | |
| + | This is the Ship Details symbol (F10 key), which shows the [[Hull]], [[Ships|Class]], Tech Level, Top Speed and Weight of your ship. | ||
[[Image:Radar Symbolc2.png]] | [[Image:Radar Symbolc2.png]] | ||
| − | This is the Radar symbol (F11 | + | |
| + | This is the Radar symbol (F11 key), which toggles the [[Radar]] map on and off. | ||
[[Image:Radarc2.png]] | [[Image:Radarc2.png]] | ||
| − | The | + | The color representation is as follows: |
| − | *A <font color="#FFFFFF">White</font> | + | *A <font color="#FFFFFF">White</font> icon with a red circle indicates your ship |
| − | *A <font color="#FFFFFF">White</font> | + | *A <font color="#FFFFFF">White</font> icon indicates a neutral ship |
| − | *A <font color="#FF0000">Red</font> | + | *A <font color="#FF0000">Red</font> icon indicates a hostile ship |
| − | *<font color="#006600">Green</font> indicates an AI Base | + | *<font color="#006600">Green</font> indicates an AI Base or a Drone |
| − | *<font color="#FF7F00">Orange</font> indicates a Player | + | *<font color="#FF7F00">Orange</font> indicates a Player Base |
| − | *<font color="#FFFF00">Yellow</font> indicates a sun | + | *<font color="#FFFF00">Yellow</font> indicates a sun |
| − | *<font color="#9BDDFF">Light Blue</font> indicates a Planet | + | *<font color="#9BDDFF">Light Blue</font> indicates a [[Planet]] |
| − | *Little <font color="#FFFFFF">White</font> | + | *Little <font color="#FFFFFF">White</font> dots represent [[Asteroids]] |
| − | *<font color="#0247FE">Blue</font> | + | *<font color="#0247FE">Blue</font> circles represent [[Wormholes]] |
[[Image:Invertory Symbolc2.png]] | [[Image:Invertory Symbolc2.png]] | ||
| − | And last but not least the Inventory symbol, in the | + | And last but not least the Inventory symbol (F12 or I key), which toggles the Inventory list on and off. |
| − | + | The Inventory is probably one of the most important windows in the game. It shows you everything that's inside your ship, including all of your [[Weapons]], your [[Shields]], [[Energy]], and other items. Here's a quick list of things you can do with it: | |
| − | + | *Right-click: This will open a context menu for any item, allowing you to interact with it | |
| + | **Equip/Unequip: Equipping items is how you make them work. You can also double-click an item to equip it. Note that some items, like [[Neuro Tweaks]], are used instead (they disappear afterwards) | ||
| + | **Add to Trade Bay: Available only while docked at a base you control, adds the selected item to the Trade List | ||
| + | **Check Market Price: This will open a window displaying the cheapest or most profitable places to buy or sell that item from. Very useful for valuing loot | ||
| + | **Use: Some items must be equipped before they can be used, and once equipped clicking Use will make them work | ||
| + | **Sell: Sells the item to the current station, can be undone at AI stations, but not player bases | ||
| + | **Toss Overboard: As the name suggests, this will shoot the selected item out the airlock | ||
| + | **Info: Displays the Infobox for the object, can also be triggered by hovering over an item for 2 seconds or more | ||
| + | **Transfer: Available when docked, this will move the item to the indicated ship or base | ||
| + | **Transfer Some...: Transfers a specified amount of the item | ||
| + | **Transfer Type...: Transfers all items of a similar kind | ||
| + | **Transfer All...: Transfers every unequipped item on the ship | ||
| + | *Click and Drag To...: This will move the item around | ||
| + | **Outside the Inventory: Tosses overboard | ||
| + | **Inside another Inventory (e.g., a base's): Transfers | ||
| + | **Into a Trade Tab: Sells item | ||
| + | **Onto the Hotbar: Sets up a hotkey for that item | ||
| + | *Shift+Click: Selects a number of items at once | ||
| + | *Ctrl+Click: Adds item to selected | ||
| + | *Destroy Augmenter: Only available for augmenters, this will destroy the augmenter selected | ||
| + | You can sort through the items in your inventory using the buttons at the top of the inventory window. Clicking one of the column headers (''Item'', ''#'', etc.) will use that column as the basis for sorting. | ||
[[Image:Top Menuc2.png]] | [[Image:Top Menuc2.png]] | ||
| − | + | The Ship Status box is located at the top left corner of the screen. It shows your [[Shields|Shield]] and its Regeneration Rate, [[Energy]] and its Regeneration, the current [[Weapon]] and Rate of Fire for that weapon. | |
| − | |||
| − | |||
| − | |||
| − | |||
| − | |||
| − | |||
| − | |||
| + | Beside that is a [[Cloaking|Visibility]] meter. Your visibility affects how easily other [[Radars]] can detect you. [[Cloaks]] are used to lower this. | ||
| + | There's also the Hotbar, which has several boxes for you to assign items to. The first 10 boxes are assigned to the 1-0 keys on your keyboard. The rest you can simply click on to activate. To assign an item to a box, simply drag it over and let go. | ||
| + | Underneath the tabs are as followed: [[Level]] and [[XP]] needed to level up, [[Credits]], Hull, Speed and Item Durability. Durability affects how well the items in your ship perform. Getting [[Killed]] lowers the durability of most equipped items on your ship. You cannot lose your items this way, but it is advisable to always Repair your ship as soon as possible! You can do this at any station or by not getting shot or shooting for 60 seconds and double-clicking the durability icon. | ||
[[Image:AI Basec2.png]] | [[Image:AI Basec2.png]] | ||
[[Image:White Tabc2.png]] | [[Image:White Tabc2.png]] | ||
| − | Just above is | + | Just above is an [[Stations|AI Base]]! These bases are scattered throughout the universe and are your main resources for new weapons, skills, ships, and more. As stated before, you can always use the Galaxy Map to identify where an AI base is. |
| − | |||
| − | And now the next important part of the game, | + | And now the next important part of the game, Missions. |
[[Image:New Missionc2.png]] [[Image:In Progressc2.png]] [[Image:Completec2.png]] | [[Image:New Missionc2.png]] [[Image:In Progressc2.png]] [[Image:Completec2.png]] | ||
Latest revision as of 11:26, 14 March 2016
Welcome to Star Sonata! We hope that the Star Sonata Wiki will be helpful to you on your journey through the game!
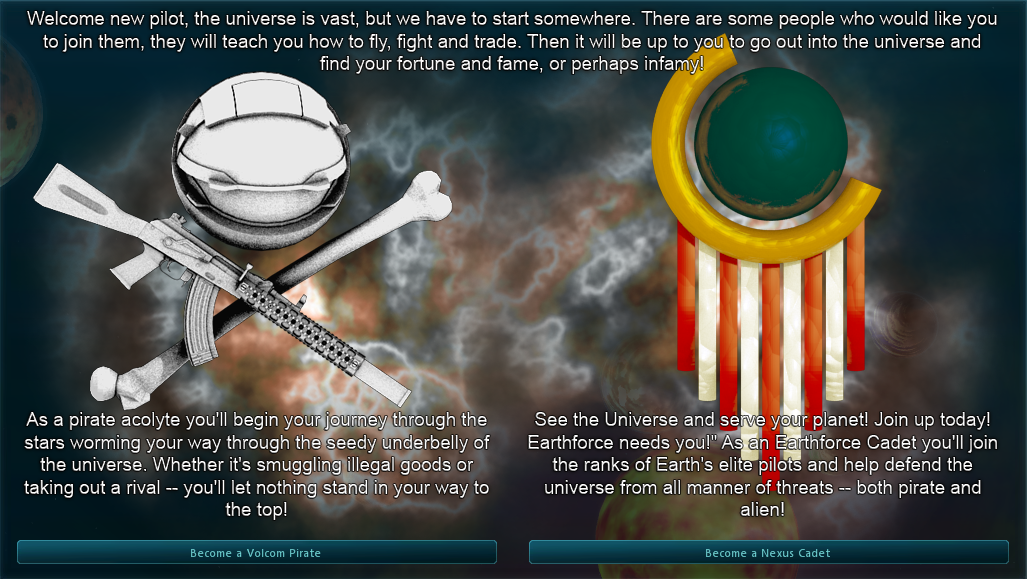
Once you have come up with a user name and password you will be able to choose a faction to join, either the Volcom Pirates or the Nexus Cadets.
Once you have chosen a side you will spawn in Volcom Testing Grounds if you chose to be a Volcom Pirate or Earthforce Outpost if you chose to be a Nexus Cadet. You will also be piloting your very first ship, the Zebucart.
Your Zebucart will have this gear on it (some will be modified).
- IonCannon
- FirstLine
- Coalfurnace
- Escape Pod
- Nooby Shipscanner
- Shield Salvation Device
- Mini Mass Driver Device
- Scoop
- Flux Capacitor
- Ande Radar
For starting players it is good to note that the Shield Salvation Device and Mini Mass Driver Device will help you greatly when used so use them often, another thing is that from certain missions and kills you will sometimes get Augmenters, these will boost the stats of your ship in certain areas. Augmenters need to be the same as or lower than the Tech Level of your ship in order to equip them. Remember that you can always destroy an equipped augmenter by right-clicking it and selecting Destroy Augmenter. However, be careful! Some augmenters are worth quite a lot, so always be sure you know what you want to do before you do it.
The chat bar is located at the bottom-left corner of the screen. It is split into seven different channels, each of which have unique purposes:
- Event Tab is where you can view what loot you scoop, when you level, when someone gives you money, and other game-related messages.
- All chat is where players can communicate with one another universally. Anyone can talk or speak in this channel.
- Trade chat is where players advertise the items they wish to buy or sell. Players can also advertise their shops here.
- Team chat is available when you have joined a Team. It allows you to speak to other teammates directly, without the need to worry about other players.
- Help chat is the place for new players to ask questions when they don't understand how something works.
- Galaxy chat is the local channel for the galaxy you are currently in. Only other players inside the same galaxy can speak to you through this channel.
- And Squad chat is to talk to people who are in the same squad as you, it will also show what other squad-mates have been scooping.
When there is a new message in a channel, its tab will begin to flash or glow.
To send a personal message to another player (in this case Demon Hunter), then you would type this command into any chat channel:
- /w "Demon Hunter" hi
A new tab will appear allowing you to make conversation with that player.
Now let's see if we can make sense of the menu system. The menu bar is located at the bottom right-hand corner of the screen.
Here's a breakdown of what each button means and what it does:
![]() This is the Warp symbol (F key), it allows you to warp into different galaxies when you are hovering over a wormhole. You will know when you can attempt to warp through a wormhole because the symbol will turn orange.
This is the Warp symbol (F key), it allows you to warp into different galaxies when you are hovering over a wormhole. You will know when you can attempt to warp through a wormhole because the symbol will turn orange.
![]() This is the Request Docking button (R key), it allows players to attempt to dock in an AI Base or a Player Base. You will know when you can attempt to dock because the symbol will turn orange.
This is the Request Docking button (R key), it allows players to attempt to dock in an AI Base or a Player Base. You will know when you can attempt to dock because the symbol will turn orange.
This is the Map symbol (F6 key), it opens the Galaxy Map and also shows what galaxy you are currently in.
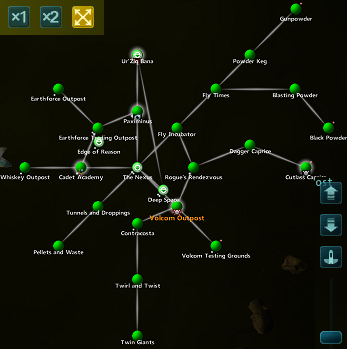
Clicking on the map button will open up the Galaxy Map. This map shows you all the places you have been, as well as a few pre-explored areas. The map is divided up into several layers, which can be changed by clicking the up or down arrows. You'll notice that your map is quite empty at first - this is okay, as you still haven't explored the Universe yet. When you enter a new galaxy for the first time, it will appear on your map and stay there for future reference. There's a lot of information on this map, but the most important to you would probably be the color coding and station tabs.
The station tabs are the white bars along the outside of each galaxy's icon. There's a single tab for each station or base in the galaxy: white for AI owned, yellow for those belonging to other players, green for your team's bases, and blue for your own (if you have any).
The color coding indicates what level of Warp Navigation you'll need to travel there. The color is also somewhat indicative of the difficulty of that galaxy, though the Danger Factor plays a much larger role.
- Green: Warp 0
- Blue: Warp 1
- Red: Warp 2
- Purple: Warp 3
Additionally, the ship button will center the map on your current location while the 1x, 2x, and crossed arrows are used to change the size of the map. You can also click one of the corners and drag to set a custom size. Lastly, you can use the scrollbar or your mouse wheel to zoom in and out on the map.
![]() This is the Options symbol (F7 or O key), which allows you to change how the game works. There are tabs for Graphics, Sound, Display, Social, and Keys. You can also toggle the Lag Killer on and off - this can sometimes help if the game is acting slow!
This is the Options symbol (F7 or O key), which allows you to change how the game works. There are tabs for Graphics, Sound, Display, Social, and Keys. You can also toggle the Lag Killer on and off - this can sometimes help if the game is acting slow!
![]() This is the Social symbol (F8 key), from which you can manage your Squad, Team, and Friends List.
This is the Social symbol (F8 key), from which you can manage your Squad, Team, and Friends List.
- Squad lets you create temporary teams. Squads are extremely useful for tackling difficult Dungeons or killing Uber AI. Any player in your squad will be treated like a Teammate, meaning any enemies of theirs are also your enemies and vice versa. Drones will also defend Squadmates, and Squadmates can be Tractored, which can be useful.
- Team lets you manage, create, and interact with your Team. In order to create a Team of your own, you'll need to get the Leadership skill first. You can join other Teams through invitation only, though many are often looking for new recruits so just ask around!
- Friends lets you create and manage your Friends List. Anyone can be added to the list, just type in their name or target them and hit the Invite Target button. If they friend you back, you'll even be able to see where they're at when they're online.
![]() This is the Character symbol (F9 key, M key for Missions), it allows you to access your Avatar, Possessions, Skills, and Missions tabs.
This is the Character symbol (F9 key, M key for Missions), it allows you to access your Avatar, Possessions, Skills, and Missions tabs.
- The Avatar tab displays your name, level, kills, and Death Debt
- The Possessions tab is a list of all your Ships, Drones, Bases, and Slaves
- The Skills tab shows what Skills you have earned and how many Skill Points you have left
- The Missions tab lists all your currently active Missions and their requirements. You can also abort or suspend (deactivate) Missions here
This is the Ship Details symbol (F10 key), which shows the Hull, Class, Tech Level, Top Speed and Weight of your ship.
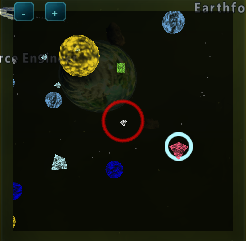
This is the Radar symbol (F11 key), which toggles the Radar map on and off.
The color representation is as follows:
- A White icon with a red circle indicates your ship
- A White icon indicates a neutral ship
- A Red icon indicates a hostile ship
- Green indicates an AI Base or a Drone
- Orange indicates a Player Base
- Yellow indicates a sun
- Light Blue indicates a Planet
- Little White dots represent Asteroids
- Blue circles represent Wormholes
![]() And last but not least the Inventory symbol (F12 or I key), which toggles the Inventory list on and off.
The Inventory is probably one of the most important windows in the game. It shows you everything that's inside your ship, including all of your Weapons, your Shields, Energy, and other items. Here's a quick list of things you can do with it:
And last but not least the Inventory symbol (F12 or I key), which toggles the Inventory list on and off.
The Inventory is probably one of the most important windows in the game. It shows you everything that's inside your ship, including all of your Weapons, your Shields, Energy, and other items. Here's a quick list of things you can do with it:
- Right-click: This will open a context menu for any item, allowing you to interact with it
- Equip/Unequip: Equipping items is how you make them work. You can also double-click an item to equip it. Note that some items, like Neuro Tweaks, are used instead (they disappear afterwards)
- Add to Trade Bay: Available only while docked at a base you control, adds the selected item to the Trade List
- Check Market Price: This will open a window displaying the cheapest or most profitable places to buy or sell that item from. Very useful for valuing loot
- Use: Some items must be equipped before they can be used, and once equipped clicking Use will make them work
- Sell: Sells the item to the current station, can be undone at AI stations, but not player bases
- Toss Overboard: As the name suggests, this will shoot the selected item out the airlock
- Info: Displays the Infobox for the object, can also be triggered by hovering over an item for 2 seconds or more
- Transfer: Available when docked, this will move the item to the indicated ship or base
- Transfer Some...: Transfers a specified amount of the item
- Transfer Type...: Transfers all items of a similar kind
- Transfer All...: Transfers every unequipped item on the ship
- Click and Drag To...: This will move the item around
- Outside the Inventory: Tosses overboard
- Inside another Inventory (e.g., a base's): Transfers
- Into a Trade Tab: Sells item
- Onto the Hotbar: Sets up a hotkey for that item
- Shift+Click: Selects a number of items at once
- Ctrl+Click: Adds item to selected
- Destroy Augmenter: Only available for augmenters, this will destroy the augmenter selected
You can sort through the items in your inventory using the buttons at the top of the inventory window. Clicking one of the column headers (Item, #, etc.) will use that column as the basis for sorting.
The Ship Status box is located at the top left corner of the screen. It shows your Shield and its Regeneration Rate, Energy and its Regeneration, the current Weapon and Rate of Fire for that weapon.
Beside that is a Visibility meter. Your visibility affects how easily other Radars can detect you. Cloaks are used to lower this.
There's also the Hotbar, which has several boxes for you to assign items to. The first 10 boxes are assigned to the 1-0 keys on your keyboard. The rest you can simply click on to activate. To assign an item to a box, simply drag it over and let go.
Underneath the tabs are as followed: Level and XP needed to level up, Credits, Hull, Speed and Item Durability. Durability affects how well the items in your ship perform. Getting Killed lowers the durability of most equipped items on your ship. You cannot lose your items this way, but it is advisable to always Repair your ship as soon as possible! You can do this at any station or by not getting shot or shooting for 60 seconds and double-clicking the durability icon.
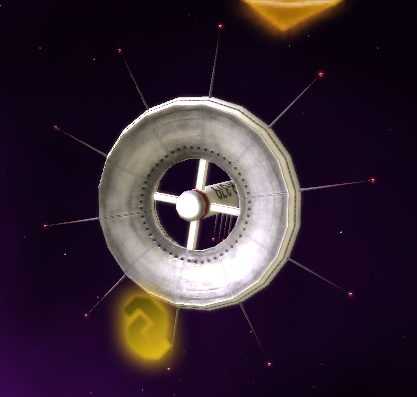
![]() Just above is an AI Base! These bases are scattered throughout the universe and are your main resources for new weapons, skills, ships, and more. As stated before, you can always use the Galaxy Map to identify where an AI base is.
Just above is an AI Base! These bases are scattered throughout the universe and are your main resources for new weapons, skills, ships, and more. As stated before, you can always use the Galaxy Map to identify where an AI base is.
And now the next important part of the game, Missions.
Missions are an important way of helping people through the game, so its not really wise to skip key missions for your Star Sonata career. The symbols above are what will hover on an AI base when you either have, in order, a New Mission, a Mission in Progress and a Completed Mission. Reading all the text in the missions will help you to feel the role that you are playing, as well as getting some handy tips to help complete the missions. Missions are located on Ai Bases.
Dying is a natural part of the game, when you die your ship will turn blue, when your ship turns yellow you can drive your escape pod over it, press R, and get back into it (Escape pods help you not to lose alot of credits.)
Hopefully that covers all the important things, we hope you enjoy your time on this adventure, see ya in the game!
